Ayla Intelligent OTA
Ayla's Over-the-Air (OTA) solution provides real-time and scheduled management and services for up to 1 million devices at a time. OTA enables manufacturers to securely send firmware updates to devices in both development and field environments. This is often required for updates needed in the communications protocol, for improvements to product functionality, and in the transport or security service. Some benefits of the OTA feature are:
- Rich user interface and capabilities.
- Ability to create, run, and report on device update jobs.
- Onboarding Analysis Reports.
- Intuitive interface to initiate updates of Host MCU, Ayla Production Agent (Black Box), or Ayla Integrated Agent (White Box) firmware.
With the release of Ayla's Intelligent OTA, you have increased flexibility and control for scheduling and running firmware updates to connected devices, for example:
- Unlimited device OTAs, so that there is no limit on the number of devices that match the rules.
- Filter-based OTAs
- Notification Analysis Reports
- Continuous OTAs
- The Ayla Platform automatically re-evaluates which devices meet OTA criteria. Devices are evaluated during connected, activated, registered, and managed stages, ensuring the most optimal time for the OTA update.
From the Ayla Customer Dashboard, you can manage OTA tasks, which include creating, updating, and tracking all OTA images (firmware updates). You can also view the list of available images (Ayla and Host MCUMicrocontroller Unit) and the status of past OTA jobs.
It is easy to access and navigate Ayla Intelligent OTA on the Ayla Customer Dashboard, as explained below:
- Log in to the Ayla Customer Dashboard using your current log-in credentials.
|
NOTE |
These are the credentials you set up to register for a developer’s account. If you have not done this, refer to the Ayla Developer’s Portal User’s Guide, AY006UDP3 on Ayla Connection. |
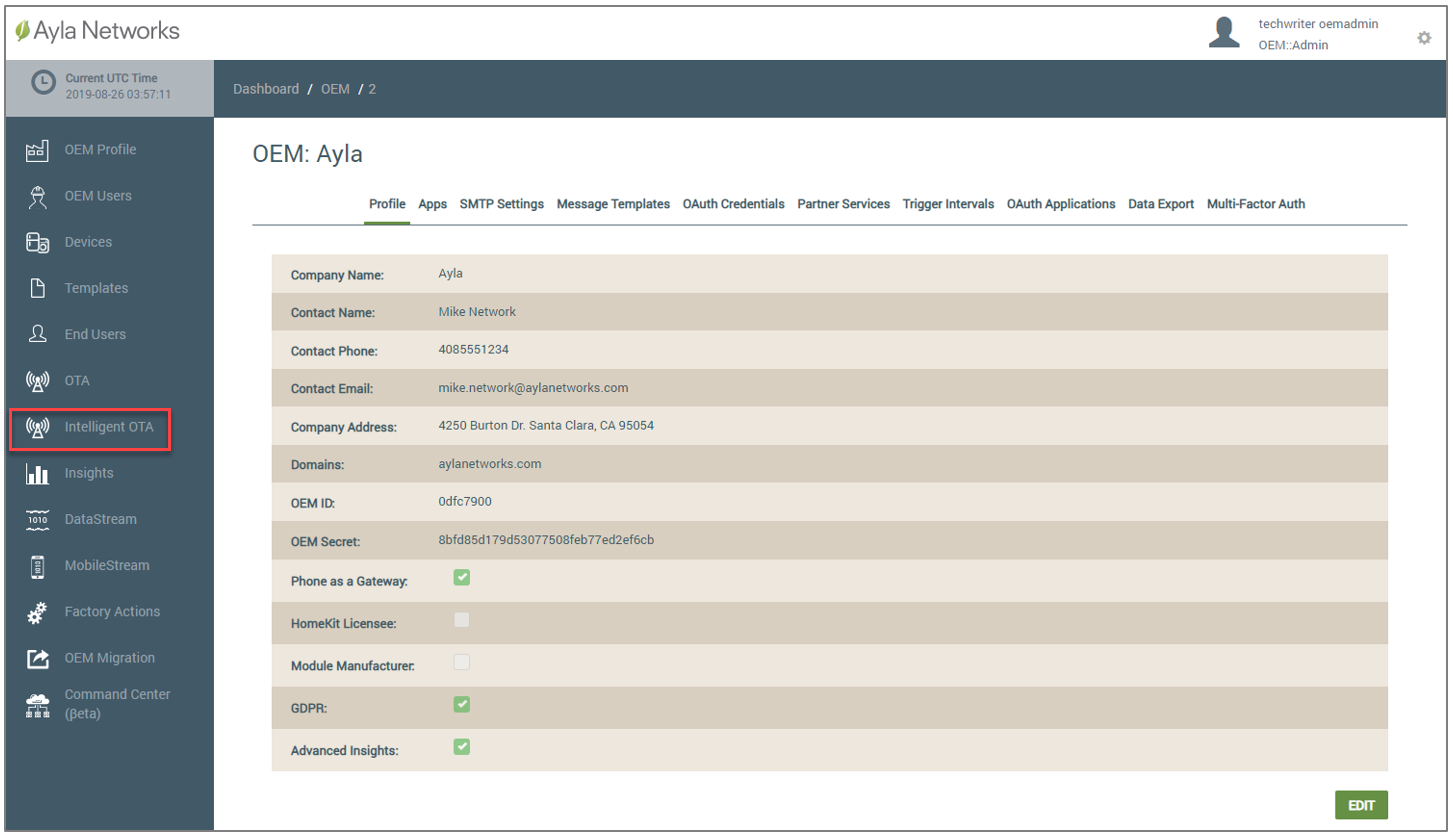
- Click Intelligent OTA in the navigation panel (on the left side of the dashboard), as shown below:
- In the drop-down for OEM Model (shown below), select the OEM model from the list. These are the model numbers of the OEM’s host application board, which are extracted from each Ayla template associated with your OEM admin role.

|
NOTE |
Only OEM admins and OEM support managers are allowed to execute OTA Host jobs in the Ayla Customer Dashboard. Refer to the following topics for more information on Ayla Roles and Templates: Ayla Default User Roles, User Roles for Access to Factory Actions, Ayla Platform OEM Types, and Ayla Templates. |
- Notice that your OEM name and the OEM model selected displays at the top left of the OTA landing page, as shown below. Click (Change) to select a different OEM Model from any of the tabs on the OTA landing page.

- Notice the three OTA tabs across the top of the page (shown below) and that the page opens to the Host MCU OTAs tab by default.
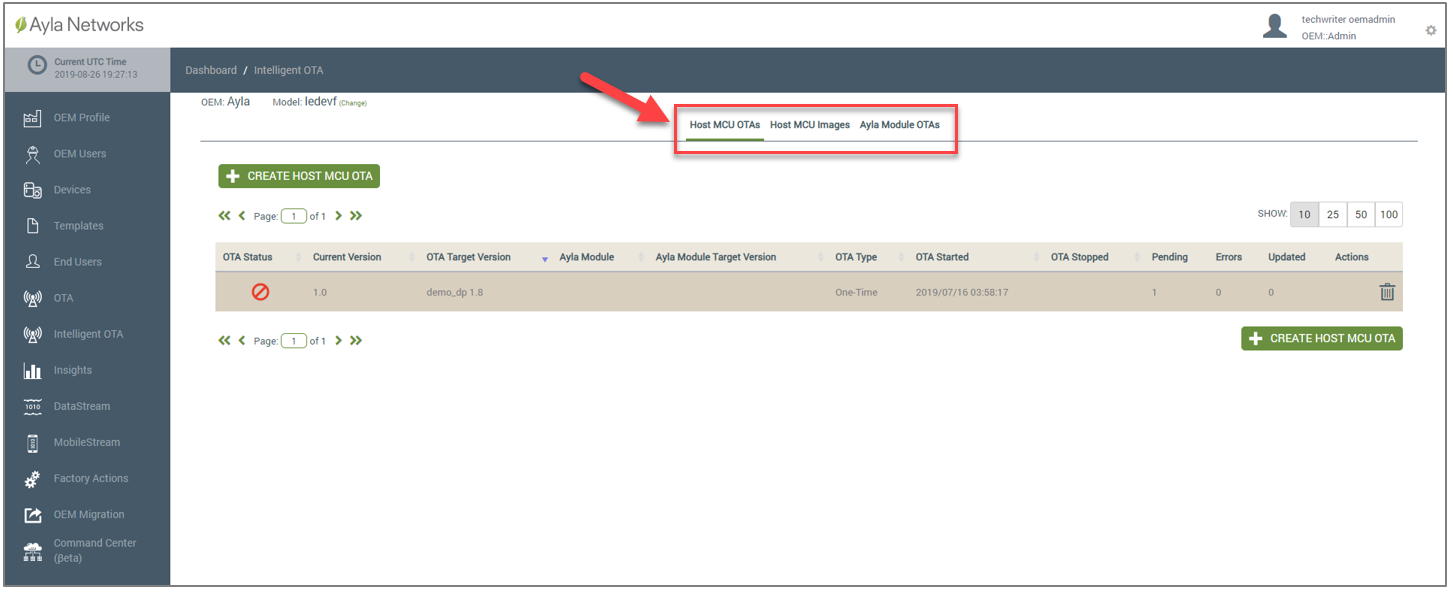
- Click the hyperlinked tab below for a description of the tab and instructions on the actions you can accomplish on the tab:
- Host MCU OTAs
- Host MCU Images
- Ayla Module OTAs
You can accomplish the following with Ayla's Intelligent OTA:
- Log in to the Ayla Customer Dashboard using your current log-in credentials.
|
NOTE |
These are the credentials you set up to register for a developer’s account. If you have not done this, refer to the Ayla Developer’s Portal User’s Guide, AY006UDP3 on Ayla Connection. |
- Click Intelligent OTA in the navigation panel (on the left side of the dashboard), as shown below:
- In the drop-down for OEM Model (shown below), select the OEM model from the list. These are the model numbers of the OEM’s host application board, which are extracted from each Ayla template associated with your OEM admin role.
|
NOTE |
Only OEM admins and OEM support managers are allowed to execute OTA Host jobs in the Ayla Customer Dashboard. Refer to the following topics for more information on Ayla Roles and Templates: Ayla Default User Roles, User Roles for Access to Factory Actions, Ayla Platform OEM Types, and Ayla Templates. |
- Click the Host MCU Images tab located at the top of the OTA landing page, as shown below.

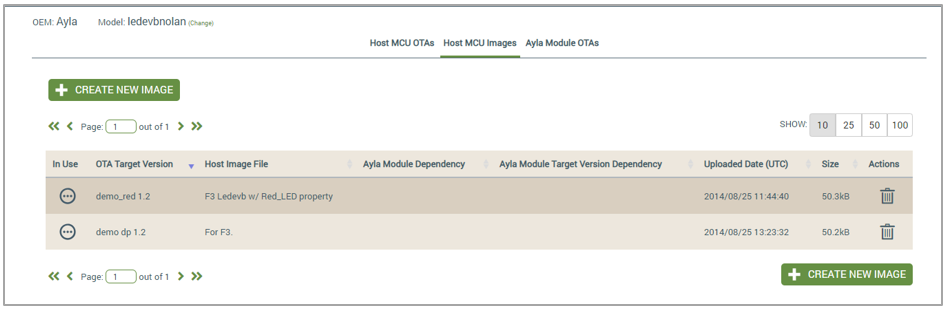
- Use the table on this tab to review and monitor information on existing images for the selected OTA model, as shown below:
|
NOTE |
You can click the column heading to sort the information in that column (including OTA Target Version, Host Image File, Ayla Module Dependency, Ayla Module Target Version Dependency, and Uploaded Date). |
Following are descriptions of the information available in this table of existing Host MCU Images on the Host MCU Images table:
- In Use
 - Indicates that the image is not included in any active OTA.
 - Indicates that the image is included in an active OTA for one or more OEMs/ OEM Models.
- OTA Target Version
The firmware version of the image that was uploaded for migration via this OTA update.
- Host Image File
The file name of the firmware image on the Ayla Module that is assigned to the OTA update about to be migrated to the field.
- Ayla Module Dependency
This is the Ayla module firmware image that came with the Ayla device(s) which should receive this OTA update. Specifying the Ayla module dependency is important because the module may be changed over the lifecycle of a device.
|
NOTE |
The Ayla platform filters out all other modules except for the one you selected for Ayla Module Dependency, and then deploys the OTA update only to the devices with that particular Ayla module. This is an efficient way to send firmware updates to select devices. |
- Ayla Module Target Version Dependency
The Ayla firmware release/version that will be sent to devices via the OTA update.
- Uploaded Date (UTC)
The date/time (in Coordinated Universal Time) that the Host image file was uploaded to the dashboard.
- Size
The size of the image.
- Actions
|
|
Trash Can icon. - Used to delete the Host MCU image. A confirmation message box displays to make sure that you wish to delete the image from the system. |
When you create a new Host MCU image in the Ayla Customer Dashboard, you are configuring an image profile. You can modify this profile as explained under Edit Existing Host MCU Images, but you cannot completely change it.
|
NOTE |
You can create a new firmware image for the Ayla Integrated Agent (White Box) in the Ayla Customer Dashboard. |
- Log in to the Ayla Customer Dashboard using your current log-in credentials.
|
NOTE |
These are the credentials you set up to register for a developer’s account. If you have not done this, refer to the Ayla Developer’s Portal User’s Guide, AY006UDP3 on Ayla Connection. |
- Click Intelligent OTA in the navigation panel (on the left side of the dashboard), as shown below:
- In the drop-down for OEM Model (shown below), select the OEM model from the list. These are the model numbers of the OEM’s host application board, which are extracted from each Ayla template associated with your OEM admin role.
- Click the Host MCU Images tab located at the top of the OTA landing page, as shown below.
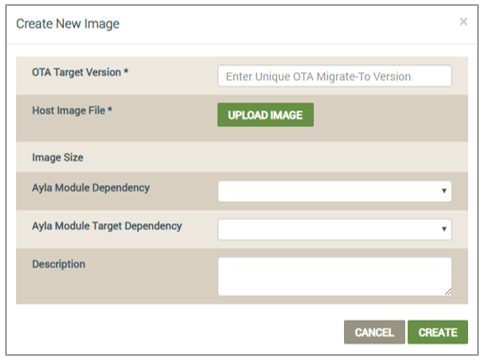
- Click the CREATE NEW IMAGE button to open the Create New Image dialog box, shown below:
|
NOTE |
Fields with an asterisk (*) are mandatory to complete the configuration. The other fields are optional; therefore, leaving them blank does not have any effect. |
- For OTA Target Version (mandatory), type the name/firmware version of the image that you are uploading for the OTA update.
- For Host Image File (mandatory), click the UPLOAD IMAGE button to navigate to and upload the Host MCU image file.
|
NOTE |
Image Size displays the size of the Host MCU image file once it is uploaded. |
- For Ayla Module Dependency (optional), select the Ayla module that has the firmware that came with the Ayla device(s) which should receive this OTA update. Specifying the Ayla module dependency is important because the module may be changed over the lifecycle of a device.
|
NOTE |
For Ayla platform filters out all other modules except for the one you selected for Ayla Module Dependency, and then deploys the OTA update only to the devices with that particular Ayla module. This is an efficient way to send firmware updates to select devices. |
- For Ayla Module Target Dependency (optional), select the Ayla module firmware release/version to send to devices via this OTA update.
|
NOTE |
If you configure Ayla Module Dependency (in Step 5), you must also enter the version of the Ayla module firmware to deploy to those devices in the Ayla Module Target Dependency field. |
- For Description (optional), type information on this Host MCU image for OTA migration, for example, “this is the software to update the ATM module from version 1.2 to 1.3.2.”
- Click the CREATE button to add this host MCU image to the list of images that can be used in OTA updates. Or, click the CANCEL button to close this dialog box without saving.
You can modify the image profile that you created (refer to Create New Host Images), but you cannot change everything in the profile, as described in the steps below.
- Log in to the Ayla Customer Dashboard using your current log-in credentials.
|
NOTE |
These are the credentials you set up to register for a developer’s account. If you have not done this, refer to the Ayla Developer’s Portal User’s Guide, AY006UDP3 on Ayla Connection. |
- Click Intelligent OTA in the navigation panel (on the left side of the dashboard), as shown below:
- In the drop-down for OEM Model (shown below), select the OEM model from the list. These are the model numbers of the OEM’s host application board, which are extracted from each Ayla template associated with your OEM admin role.
- Click the Host MCU Images tab located at the top of the OTA landing page, as shown below.
- Click the image you wish to edit in Host Image File column of the table listing. This opens the View Host MCU Image dialog box, shown below:
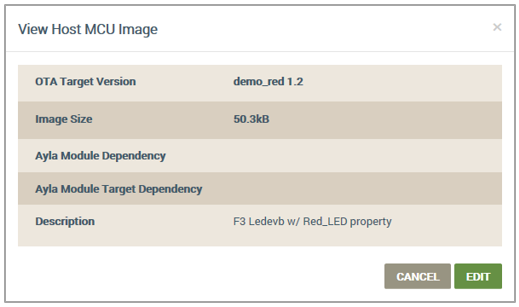
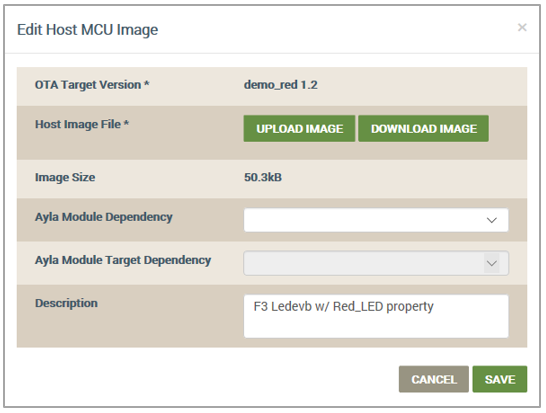
- Click EDIT to change the dialog box to Edit Host MCU Image, as shown below:
|
NOTE |
Fields with an asterisk (*) are mandatory to complete the configuration. The other fields are optional; therefore, leaving them blank does not have any effect. |
- In Host Image File (mandatory), click UPLOAD IMAGE to replace the current Host MCU image with a different one, or click DOWNLOAD IMAGE to back up this image in another location.
|
NOTE |
Image Size displays the size of the new Host MCU image file once it is uploaded. |
- For Ayla Module Dependency (optional), select the Ayla module that has the firmware that came with the Ayla device(s), which should receive this OTA update. Specifying the Ayla module dependency is important because the module may be changed over the lifecycle of a device.
|
NOTE |
The Ayla platform filters out all other modules except for the one you selected for Ayla Module Dependency, and then deploys the OTA update only to the devices with that particular Ayla module. This is an efficient way to send firmware updates to select devices. |
- For Ayla Module Target Dependency (optional), select the Ayla module firmware release/version to send to devices via this OTA update.
|
NOTE |
If you configure Ayla Module Dependency (in Step 8), you must also enter the version of the Ayla module firmware to deploy to those devices in the Ayla Module Target Dependency field. |
- In Description (optional), change the information for this new Host MCU image that you uploaded.
- Click SAVE to make your changes to the information for this Host MCU image in the table listing. Or click CANCEL to close this dialog box without saving.
- Navigate and log in to the Ayla Customer Dashboard using your current log-in credentials.
|
NOTE |
These are the credentials you set up to register for a developer’s account. If you have not done this, refer to the Ayla Developer’s Portal User’s Guide, AY006UDP3 on Ayla Connection. |
- Click Intelligent OTA in the navigation panel (on the left side of the dashboard), as shown below:
- In the Select Model drop-down list (shown below), select the OEM model from the list. These are the model numbers of the OEM’s host application board, which are extracted from each Ayla template associated with your OEM admin role.
- Click the Host MCU OTAs tab located at the top of the OTA landing page, as shown below.

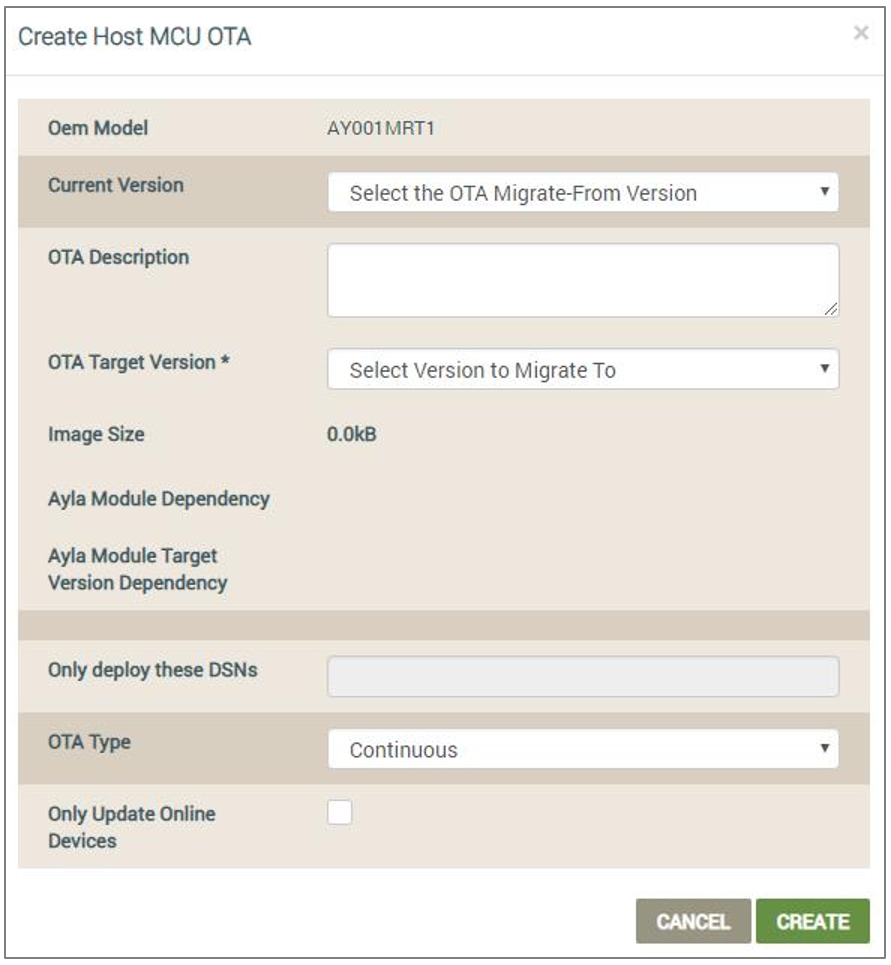
- Click the CREATE HOST MCU OTA button to open the Create Host MCU OTA dialog box, shown below:
|
NOTE |
Fields with an asterisk (*) are mandatory to complete the configuration. The other fields are optional; therefore, leaving them blank does not have any effect. |
- For OEM Model, notice that the OEM model that you selected when accessing Intelligent OTA is shown in this field to emphasize that the OTA job will be scheduled for devices with this specific OEM model.
- In Current Version (optional), select the version number of the Host MCU firmware on the devices that will receive this OTA update. If you do not select a firmware version in this drop-down list, the OTA update is deployed to every device that has any of the firmware versions provided in this drop-down list.
- In OTA Description (optional), type any additional pertinent information for this OTA that may be a useful reference later, for example, “Migrate the device from 2.5 beta to 2.5.4 beta.”
- In OTA Target Version (mandatory), select the firmware version of the module that will be deployed by this OTA update.
|
NOTE |
Image Size displays the size of the Host MCU image file for the module you selected to receive the OTA Target Version. The file size can be used to estimate the time and effort that the device agent requires for downloading and installation. The image is stored on the Ayla platform until deleted by the user. |
- For Ayla Module Dependency (optional), select the Ayla module that has the firmware that came with the Ayla device(s) which should receive this OTA update. Specifying the Ayla module dependency is important because the module may be changed over the lifecycle of a device.
The Ayla platform filters out all other modules except for the one you selected for Ayla Module Dependency, and then deploys the OTA update only to the devices with that particular Ayla module. This is an efficient way to send firmware updates to select devices.
- For Ayla Module Target Dependency (optional), select the Ayla module firmware release/ version to send to devices via this OTA update.
|
NOTE |
If you configure Ayla Module Dependency (in Step 9), you must also enter the version of the Ayla module firmware to deploy to those devices in the Ayla Module Target Dependency field. |
- If you are creating a One-Time OTA job (see Step 13 below), for Only Deploy these DSNs, enter as many as 50 Device Serial Numbers (DSNs) of devices in the field that will be processed by this OTA update. Use a comma (,) to separate the DSNs. This field enables you to specify an exclusive set of DSNs to test the OTA update.
You can only enter a maximum of 50 DSNs in this field and it cannot be used for Continuous OTA. Continuous OTA jobs update all devices continuously. The devices must meet the OTA rule criteria (mainly the current and target OEM models must be set up correctly).
If you use the Only Deploy these DSNs option, the following warning message appears to make sure that you understand how this option may affect the OTA job.
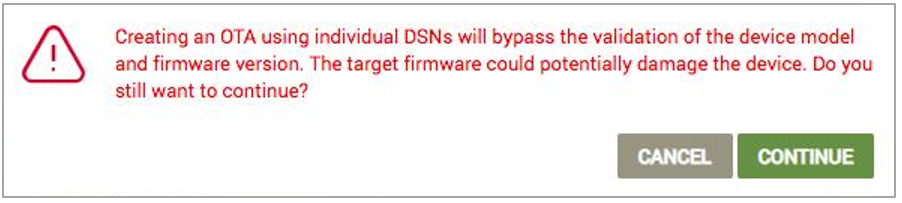
This potential damage may occur if you do not enter the correct DSNs because validations are skipped when you use this option. Therefore, if the wrong DSN is entered, that device could become damaged from receiving a firmware update that should not be installed on the device.
One way to mitigate the potential damage in the warning is to make sure that the OEM Model (in Step 6), the Current version (Step 7), and OTA target version (Step 9) match the selected image (whose size is diplayed Image Size field as noted in Step 9).
- For OTA Type (optional), select either of the following options to specify which OTA criteria should be applied to this OTA update:
- Continuous (Default) – When this OTA update is active, the Ayla platform automatically continues to evaluate which devices in the field meet the OTA criteria for this OTA update, and if new devices that match the criteria are added, the platform will identify those devices as candidates and push this OTA update at runtime to those new devices when they are online. For example, when a device connects to the Ayla cloud and it processes the device from the “unknown” to “known” state, the Ayla platform will check to see if the device meets the OTA rules for continuous OTA updates, and if the device matches the OTA rules, the OTA update is pushed to that new device.
- One Time - Once this OTA update is activated, the Ayla platform evaluates which devices match the OTA criteria for this update, and then pushes the update to those devices. This evaluation only happens one time upon activating the OTA update.
- Click the checkbox called Only Update Online Devices to instruct the OTA service to only add devices that are online to the OTA queue for updates.
- Click the Create button to add this host MCU OTA job to the list of images that can be used in OTA updates. Or, click the Cancel button to close this dialog box without saving.
- Navigate and log in to the Ayla Customer Dashboard using your current log-in credentials.
|
NOTE |
These are the credentials you set up to register for a developer’s account. If you have not done this, refer to the Ayla Developer’s Portal User’s Guide, AY006UDP3 on Ayla Connection. |
- Click Intelligent OTA in the navigation panel (on the left side of the dashboard), as shown below:
- In the drop-down for OEM Model (shown below), select the OEM model from the list. These are the model numbers of the OEM’s host application board, which are extracted from each Ayla template associated with your OEM admin role.
- Click the Host MCU OTAs tab located at the top of the OTA landing page, as shown below.
- Click the Host MCU OTA job you wish to edit, as shown below:
- On the right, notice that the page is similar to the Create Host MCU OTA dialog box; see the following as an example:
|
NOTE |
You cannot edit active OTA jobs. Stop the OTA update on the Host MCU OTAs tab to enable the editing capabilities. To do this, refer to to Actions under Manage OTAs for Host MCU Applications. |
- Click the EDIT button to display the edit view, as shown:
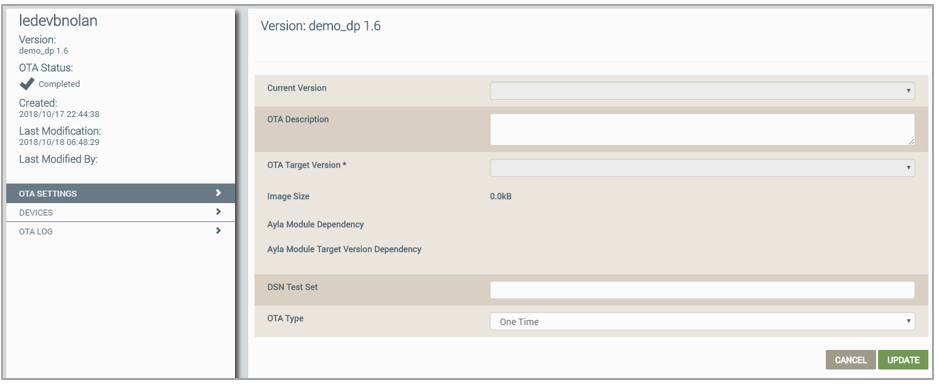
- Edit or enter new information for any of the fields in this dialog box; refer to steps 6-12 for Edit Existing Host MCU Images for an explanation of the information needed in each field.
- Click the UPDATE button to save your changes. Or, click the Cancel button to close this edit view without saving.
- Navigate and log in to the Ayla Customer Dashboard using your current log-in credentials.
|
NOTE |
These are the credentials you set up to register for a developer’s account. If you have not done this, refer to the Ayla Developer’s Portal User’s Guide, AY006UDP3 on Ayla Connection. |
- Click Intelligent OTA in the navigation panel (on the left side of the dashboard), as shown below:
- In the Select Model drop-down list (shown below), select the OEM model from the list. These are the model numbers of the OEM’s host application board, which are extracted from each Ayla template associated with your OEM admin role.
- Click the Host MCU OTAs tab located at the top of the OTA landing page, as shown below.
- Click the Host MCU OTA job you wish to edit, as shown below:
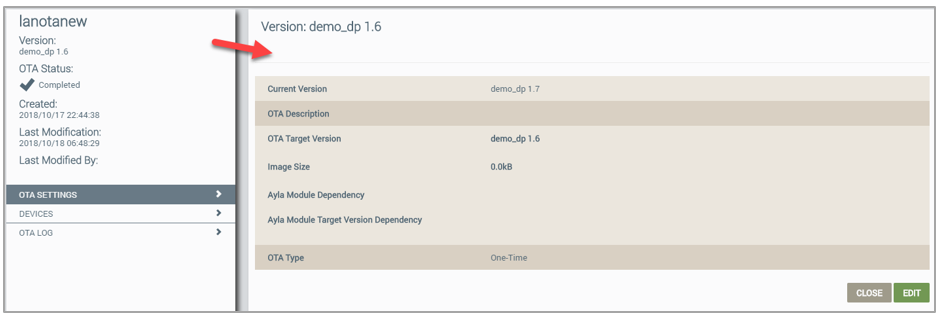
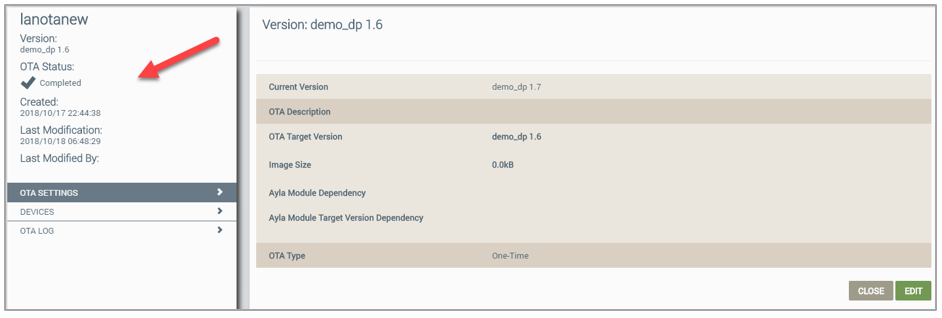
- On the left side of the page with OTA SETTINGS selected (which is the default), review the status information on the selected OTA job. Refer to the following example:
- Click DEVICES (also on left side) to view the following information on the devices for this OTA job:
- Device Pending - This tab shows all devices (as many as one million) that are scheduled to receive this OTA update (based on the definition of the OTA job).
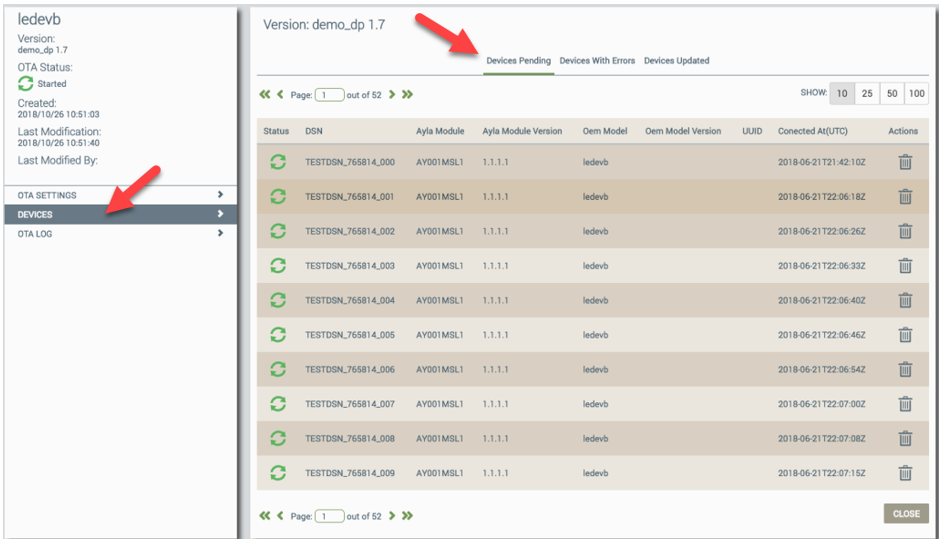
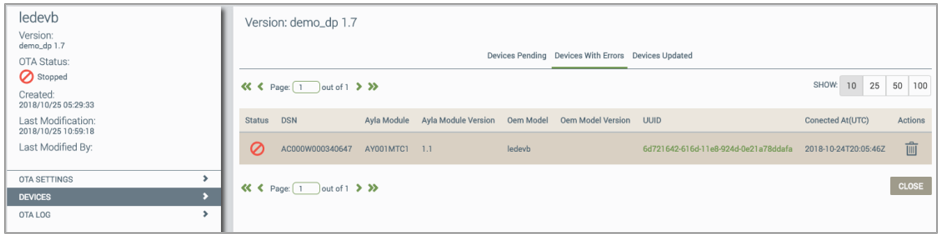
- Devices with Errors - This tab shows all devices on which the OTA update did not complete due to a hard error, such as a timeout or a device that is no longer online. Refer to the examples of these errors in the topic called Intelligent OTA: Device Errors.
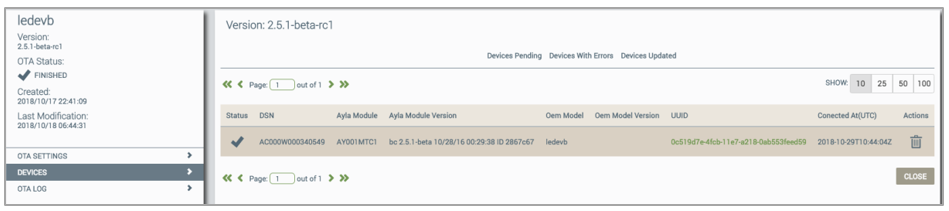
- Devices Updated - This tab shows all the devices that have completed this OTA.
All the Devices tabs provide the following information and options:
- Status - The OTA status of the device; refer to Step 8 below for a list and descriptions of these statuses.
- DSN - The Device Serial Number of the device.
- Ayla Module - The ID of the Ayla module that is on the selected OEM model.
- Ayla Module Version - The version number of the firmware on the Ayla module, which is on the selected OEM model.
- OEM Model - the name/ID of the selected OEM model.
- UUID - The Universally Unique Identifier on the selected OEM model.
- Connected At (UTC) - The time/date stamp (in Universal Time) that the OTA job was started for this device.
- Actions - The OTA actions that you can apply to this device; refer to Actions under Manage OTAs for Host MCU Applications for the complete list and descriptions of these OTA actions.
- CLOSE - This button enables you to return to the Host MCU OTAs tab.
-
Click OTA LOG to view a history of the selected OTA job, as shown below. The OTA Log is used for debugging purposes.
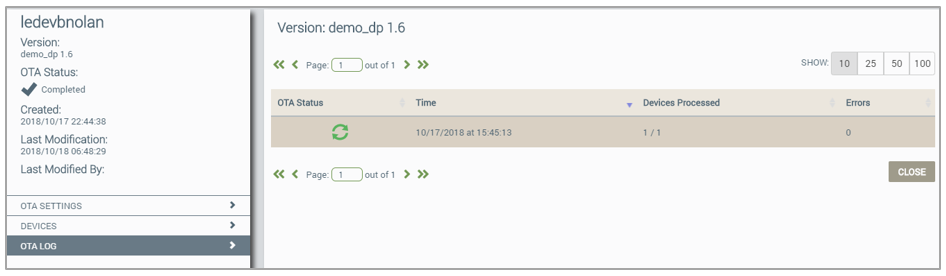
- OTA Status

|
Indicates pending OTA update (not started yet). |

|
Indicates a completed OTA update. NOTE: For Continuous OTA jobs, this status may change to Active for new devices that come online and match the OTA criteria for the continuous OTA job. |

|
Indicates an active OTA update. This displays when the OTA job becomes active and remains until it is completed or canceled. |

|
Indicates that the OTA update was cancelled (or stopped). |
- Time (depends on the OTA status):
- Indicates the start time for active OTA updates.
- Indicates the stop time for stopped or cancelled OTA updates.
- Devices Processed – When the OTA update is stopped or cancelled, displays the number of devices that received the OTA update.
- Errors - When the OTA update is stopped or cancelled, displays the number of devices that had errors during this OTA update.
- CLOSE – This button enables you to return to the Host MCU OTAs tab.
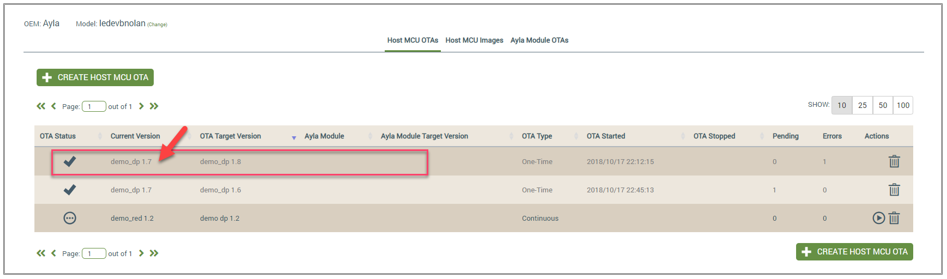
All the tabs on the OTA page enable you to manage your OTA jobs remotely, so that you can, for example, report to your operations teams with a clear understanding of current and historic OTA runs. When you click Intelligent OTA in the navigation panel, the Host MCU OTAs tab displays (as shown in the example below).
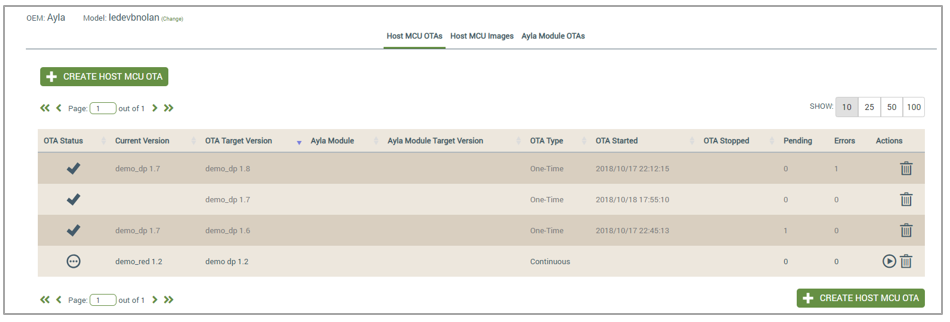
This tab provides the status and basic information on your OTA jobs, which is described below:
- OTA Status
|
|
Indicates pending OTA update (not started yet). |
|
|
Indicates a completed OTA update. NOTE: For Continuous OTA jobs, this status may change to Active for new devices that come online and match the OTA criteria for the continuous OTA job. |
|
|
Indicates an active OTA update. This displays when the OTA job becomes active and remains until it is completed or canceled. |
|
|
Indicates that the OTA update was canceled (or stopped). |
- Current Version – Displays the name/version number of the module that should receive this OTA update.
- OTA Target Version – Displays the firmware version of the module that will be deployed by this OTA update.
- Ayla Module – Displays the name/ID of the Ayla module that is on the selected OEM model.
- Ayla Module Target Version – Displays he Ayla firmware release/version that is about to be pushed to devices via the OTA update.
- OTA Type:
- Continuous – When new devices that match the criteria of this OTA job are added and online, the Ayla platform will push this OTA update at runtime of those new devices.
- One Time – This OTA update is pushed only one time to the devices that match the OTA criteria upon activating the OTA job.
- OTA Started – The timestamp for the start of this OTA job. NOTE: If the Current Version associated with this OTA job is active in another, you must stop that job before starting this one.
- OTA Stopped – The timestamp of the end of this OTA job, whether it was stopped upon completing all processing, or manually stopped for other reasons.
- Pending – The number of devices that are scheduled to receive this OTA update based on the OTA job. If a filter is applied to the OTA job, only devices within the filter range receive the update. Refer to Steps 8 and 9 under Create New Host MCU Images for a description of Ayla Module Dependency and Ayla Module Target version filters.
- Errors – When the OTA update is stopped or canceled, displays the number of devices that had errors during this OTA update.
- Actions:

|
Click to start/activate an OTA job. |

|
Click to stop an active OTA job. |

|
Click to delete the OTA job. If the OTA update is running, a confirmation displays to make sure you want to delete this job while it is active. |
|
|
Indicates that the OTA update was canceled (or stopped). |
Ayla images are part of the Ayla module that you select when configuring OTA jobs in the Ayla Customer Dashboard. This is done when you add a new Ayla module OTA job, which is explained below:
- Navigate and log in to the Ayla Customer Dashboard using your current log-in credentials.
|
NOTE |
These are the credentials you set up to register for a developer’s account. If you have not done this, refer to the Ayla Developer’s Portal User’s Guide, AY006UDP3 on Ayla Connection. |
- Click Intelligent OTA in the navigation panel (on the left side of the dashboard), as shown below:
- In the Select Model drop-down list (shown below), select the OEM model from the list. These are the model numbers of the OEM’s host application board, which are extracted from each Ayla template associated with your OEM admin role.
- Click the Ayla Module OTAs tab located at the top of the OTA landing page, as shown below.

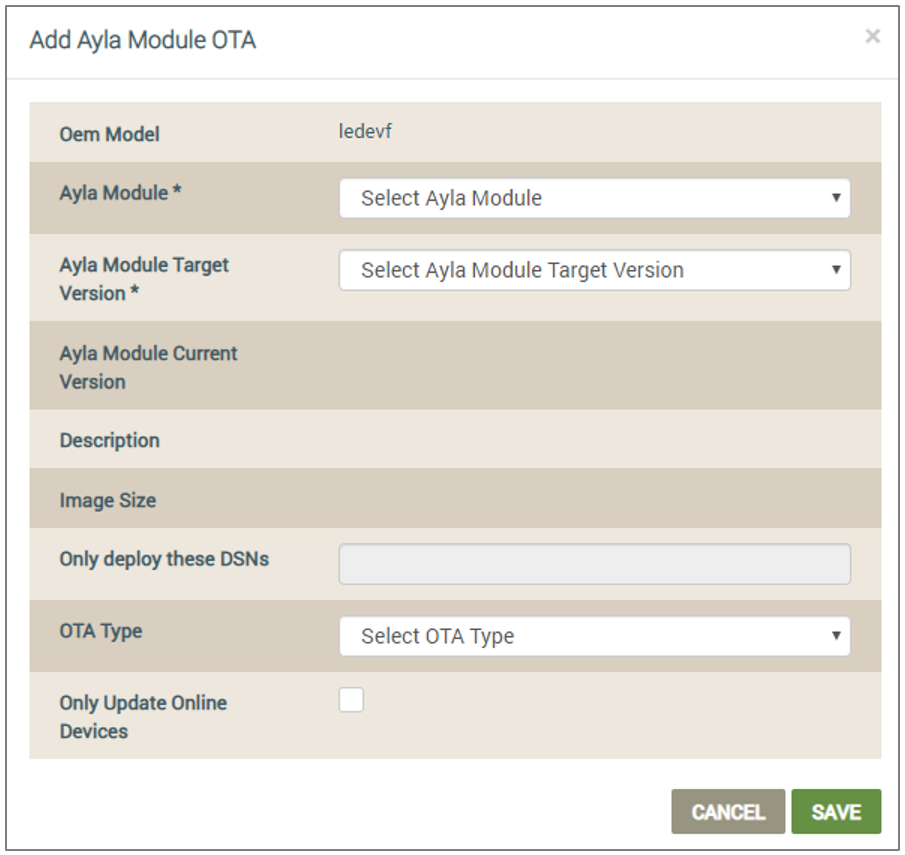
- Click the ADD AYLA MODULE OTA button to open the Add Ayla Module OTA dialog box, shown below:
|
NOTE |
Fields with an asterisk (*) are mandatory to complete the configuration. The other fields are optional; therefore, leaving them blank does not have any effect. |
- For OEM Model, notice that the OEM model that you selected when accessing Intelligent OTA is shown in this field to emphasize that the OTA job will be scheduled for devices with this specific OEM model.
- In the Ayla Module drop-down list (mandatory), select the name/ID of the Ayla module on the OEM model you selected.
- In Ayla Module Target Version (mandatory), select the version of the module that will be deployed by this OTA update.
|
NOTE |
The following fields populate based on your entries in Steps 6 and 7: |
- If you are creating a One Time OTA job (see Step 12 below), for Only Deploy these DSNs, enter as many as 50 Device Serial Numbers (DSNs) of devices in the field that will be processed by this OTA update. Use a comma (,) to separate the DSNs. This field enables you to specify an exclusive set of DSNs to test the OTA update.
|
NOTE |
You can only enter a maximum of 50 DSNs in this field, and it cannot be used for Continuous OTA. Continuous OTA jobs update all devices continuously. The devices must meet the OTA rule criteria. |
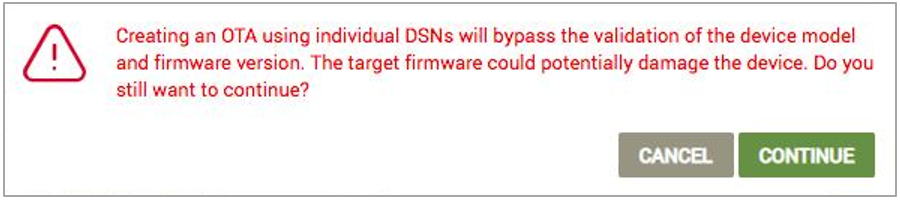
If you use the Only Deploy these DSNs option, the following error message appears to make sure that you understand how this option affects the OTA job.
- For OTA Type (optional), select either of the following options to specify which OTA criteria should be applied to this OTA update:
- Continuous (Default) – When this OTA update is active, the Ayla platform automatically continues to evaluate which devices in the field meet the OTA criteria for this OTA update, and if new devices that match the criteria are added, the platform will identify those devices as candidates and push this OTA update at runtime to those new devices when they are online. For example, when a device connects to the Ayla cloud and it processes the device from the “unknown” to “known” state, the Ayla platform will check to see if the device meets the OTA rules for continuous OTA updates, and if the device matches the OTA rules, the OTA update is pushed to that new device.
- One Time - Once this OTA update is activated, the Ayla platform evaluates which devices match the OTA criteria for this update, and then pushes the update to those devices. This evaluation only happens one time upon activating the OTA update.
- Click the checkbox called Only Update Online Devices to instruct the OTA service to only add devices that are online to the OTA queue for updates.
- Click the Save button to add this Ayla OTA job to the list that can monitored or changed on the Ayla Module OTAs tab. Or, click the Cancel button to close this dialog box without saving.
- Navigate and log in to the Ayla Customer Dashboard using your current log-in credentials.
|
NOTE |
These are the credentials you set up to register for a developer’s account. If you have not done this, refer to the Ayla Developer’s Portal User’s Guide, AY006UDP3 on Ayla Connection. |
- Click Intelligent OTA in the navigation panel (on the left side of the dashboard), as shown below:
- In the OEM Model drop-down list (shown below), select the OEM model from the list. These are the model numbers of the OEM’s host application board, which are extracted from each Ayla template associated with your OEM admin role.
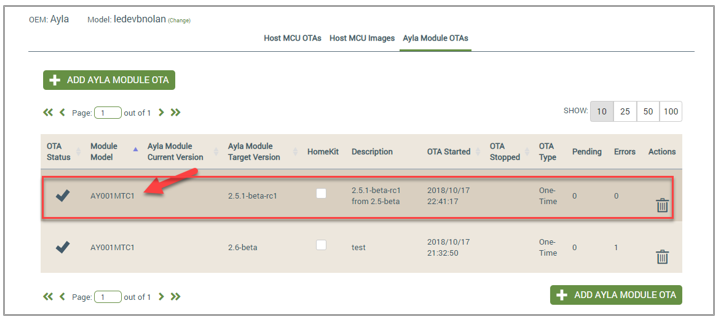
- Click the Ayla Module OTAs tab located at the top of the OTA landing page, as shown below.
- Click the Ayla Module OTA job you wish to edit, as shown below:
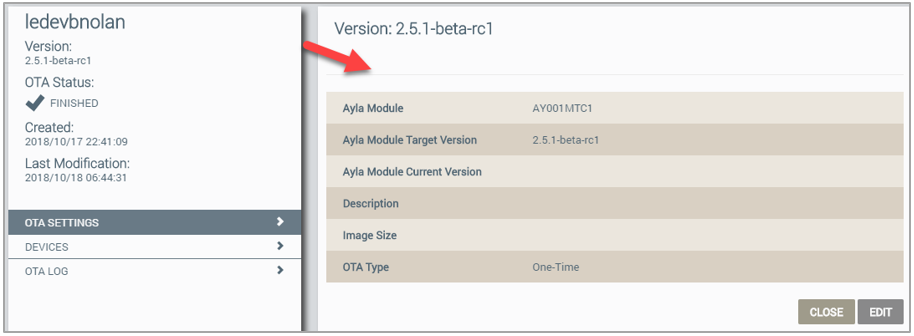
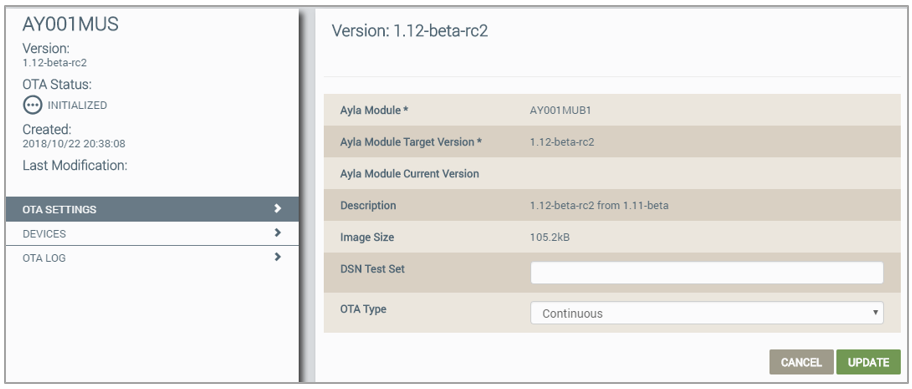
- On the right, notice that the page is similar to the Add Ayla Module OTA dialog box; see the following as an example:
|
NOTE |
You cannot edit active OTA jobs. Stop the OTA update on the Host MCU OTAs tab to enable the editing capabilities. Refer to Actions described under Manage OTAs for Host Applications. |
- Click the EDIT button to display the edit view, as shown:
- Edit or enter new information for any of the fields in this dialog box; refer to steps 6-10 under Create a New Ayla Module OTA Job for an explanation of the information needed in each field.
- Click the UPDATE button to save your changes. Or, click the Cancel button to close this edit view without saving.
- Navigate and log in to the Ayla Customer Dashboard using your current log-in credentials.
|
NOTE |
These are the credentials you set up to register for a developer’s account. If you have not done this, refer to the Ayla Developer’s Portal User’s Guide, AY006UDP3 on Ayla Connection. |
- Click Intelligent OTA in the navigation panel (on the left side of the dashboard), as shown below:
- In the Select Model drop-down list (shown below), select the OEM model from the list. These are the model numbers of the OEM’s host application board, which are extracted from each Ayla template associated with your OEM admin role.
- Click the Ayla Module OTAs tab located at the top of the OTA landing page, as shown below.
- Click the Ayla Module OTA job that you wish to review, as shown below:
- On the left side of the page with OTA SETTINGS selected (which is the default), review the status information on the selected OTA job. Refer to the following example:
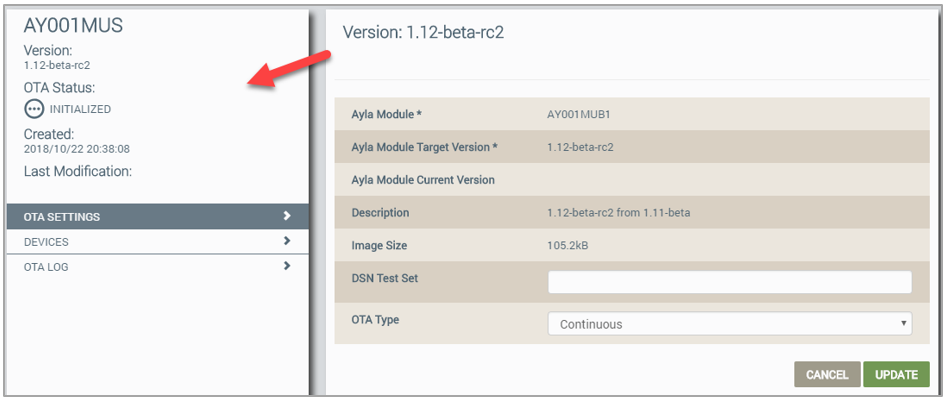
- Click DEVICES (also on left side) to view the following information on the devices for this OTA job:
- Device Pending - This tab shows all devices that are scheduled to receive this OTA update (based on the definition of the OTA job).
- Devices with Errors - This tab shows all devices on which the OTA update did not complete due to a hard error, such as a timeout or a device that is no longer online.
- Devices Updated - This tab shows all the devices that have completed this OTA.
All the Devices tabs provide the following information and options:
- Status - The OTA status of the device; refer to Step 8 below for a list and descriptions of these statuses.
- DSN - The Device Serial Number of the device.
- Ayla Module - The ID of the Ayla module that is on the selected OEM model.
- Ayla Module Version - The version number of the firmware on the Ayla module, which is on the selected OEM model.
- OEM Model - the name/ID of the selected OEM model.
- OEM Model Version – This is the Host software (SW) version.
- UUID - The Universally Unique Identifier on the selected OEM model.
- Connected At (UTC) - The time/date stamp (in Universal Time) that the OTA job was started for this device.
- Actions - The OTA actions that you can apply to this device; refer to Actions under Manage OTAs for Host MCU Applications for the complete list and descriptions of these OTA actions.
- CLOSE - This button enables you to return to the Host MCU OTAs tab.
- Click OTA LOG to view a history of the selected OTA job, as shown below. The OTA Log is used for debugging purposes.

- OTA Status
|
|
Indicates pending OTA update (not started yet). |
|
|
Indicates a completed OTA update. NOTE: For Continuous OTA jobs, this status may change to Active for new devices that come online and match the OTA criteria for the continuous OTA job. |
|
|
Indicates an active OTA update. This displays when the OTA job becomes active and remains until it is completed or canceled. |
|
|
Indicates that the OTA update was canceled (or stopped). |
- Time (depends on the OTA status):
- Indicates the start time for active OTA updates.
- Indicates the stop time of stopped or canceled OTA updates.
- Devices Processed – When the OTA update is stopped or cancelled, displays the number of devices that received the OTA update.
- Errors - When the OTA update is stopped or cancelled, displays the number of devices that had errors during this OTA update.
- Click the CLOSE button to to return to the Ayla Module OTAs tab.
Refer to Intelligent OTA | Device Error Codes for examples of the errors that can occur when issuing the commands that are used to exchange messages between the Ayla module and the host MCU during the OTA update process.
Click here for a list of best practices when moving from the Ayla Developer's Portal to the Ayla Customer Dashboard.
See also: Intelligent OTA: Host MCU OTAs tab, Access the Ayla Customer Dashboard, Default User Roles, User Roles for Access to Factory Actions, Ayla Platform OEM Type, Intelligent OTA: Device Error Codes, Intelligent OTA: Best Practices.
How to get here on the dashboard: Click Intelligent OTA in the Navigation Panel.
Please click here to let us know how we're doing. Thank you.